

How to Take a Screenshot on Mac—Step-by-Step Guide
Mac users often need to take screenshots for work, school, or personal use, but not everyone knows how to do it efficiently. Whether you’re capturing a specific window, an entire screen, or just a portion, macOS makes it incredibly simple. In this article, we’ll walk you through every step of taking screenshots on a Mac, ensuring that even beginners can follow along easily. Let’s dive right in!
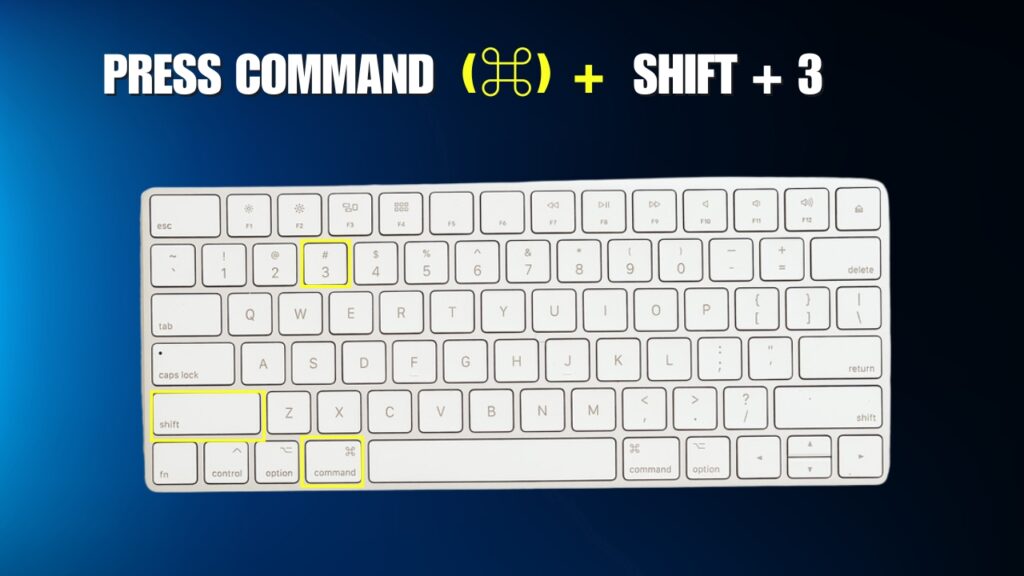
Method 1: Capture the Entire Screen
If you want to capture everything visible on your Mac screen, follow these steps:
- Press Command (⌘) + Shift + 3
- This combination instantly captures the entire screen and saves the image to your desktop.
Method 2: Capture a Specific Area of the Screen
Want to grab just a portion of the screen? Here’s how:
- Press Command (⌘) + Shift + 4
- Your cursor will change to a crosshair.
- Select the Area You Want to Capture
- Click and drag the crosshair to highlight the desired section of your screen. Release the mouse to take the screenshot.
- Find Your Screenshot
- Just like before, the file will appear on your desktop.
Pro Tip: If you make a mistake while selecting the area, press the Esc key to cancel and start over.
Method 3: Capture a Specific Window or Menu
This method is perfect if you only need to capture an open window, menu, or dialog box:
- Press Command (⌘) + Shift + 4, Then Press Spacebar
- Your cursor will change to a camera icon.
- Click the Window or Menu You Want to Capture
- Hover over the desired window or menu until it highlights, then click to take the screenshot.
- Access Your Screenshot
- As always, the screenshot is saved on your desktop.
Method 4: Use the Screenshot Toolbar (macOS Mojave or Later)
macOS Mojave and newer versions include a handy screenshot toolbar. To access it:
- Press Command (⌘) + Shift + 5
- A toolbar will appear at the bottom of your screen with multiple options:
- Capture the entire screen.
- Capture a selected window.
- Capture a selected portion.
- A toolbar will appear at the bottom of your screen with multiple options:
- Choose Your Desired Option
- Click on the appropriate icon for what you want to capture.
- Customize Options (Optional)
- Click “Options” in the toolbar to adjust settings, like where to save your screenshot or set a timer.
- Take the Screenshot
- Once everything is set, click “Capture” to save the image.
Method 5: Take Screenshots Using Preview
Preview is another built-in tool on macOS that allows you to take screenshots and edit them.
- Open Preview
- Go to
Applications > Previewor search for it using Spotlight().Command + Space
- Go to
- Select “Take Screenshot.”
- Click,
File > Take Screenshotand choose from these options:- From Selection
- From Window
- From Entire Screen
- Click,
- Capture and Save
- Follow the prompts to capture your screenshot, then save it to your desired location.
Where Are Screenshots Saved?
By default, screenshots are saved to your desktop. However, you can change this location:
- Open the Screenshot Toolbar
- Press
Command (⌘) + Shift + 5.
- Press
- Click “Options”
- Under “Save To,” choose a new location like Documents or a custom folder.
How to Edit Screenshots on Mac
After capturing a screenshot, you might want to edit it. macOS provides built-in editing tools:
- Open the Screenshot
- Double-click the screenshot file to open it in Preview.
- Use Markup Tools
- Add text, shapes, highlights, or annotations.
- Save the Edited Screenshot
- Click
File > Saveto keep your changes.
- Click
Frequently Asked Questions (FAQs)
Q: Can I take screenshots on a MacBook Pro the same way?
Yes, the methods are the same for all Mac computers, including MacBook Pro, MacBook Air, and iMac.
Q: How can I copy a screenshot to the clipboard instead of saving it?
Hold the Control key while taking the screenshot (e.g.,Command + Shift + Control + 4. This will copy the screenshot to your clipboard, which you can paste ()Command + V into any app.
Q: Can I take screenshots of videos or movies?
Yes, but some apps may block screenshots due to copyright restrictions. As a workaround, you can record your screen using QuickTime Player.
Taking screenshots on a Mac is incredibly easy once you know the right shortcuts and tools. Whether you need to capture the entire screen, a specific window, or just a portion, macOS offers multiple options to suit your needs. Practice these methods, and soon you’ll be a screenshot pro!
Remember, screenshots are more than just images—they’re a way to communicate visually. Use them effectively to share ideas, save memories, or troubleshoot issues. Happy screenshotting!
Please leave a comment; this content is helpful.

